How to Put a Picture on a Headstone
It’s becoming popular to put a picture of a deceased loved one on their headstone to give it some personalization that goes far beyond just the inscription. There are several different ways this can be accomplished. Some people will put an actual original photograph in a plastic frame with a clear plastic cover and attach it to the stone with a bathroom style stick on hook, or double sided tape.
The problem with this is it will definitely ruin your cherished photo. Even if you use a copy, it will still look awful in just a matter of a few weeks from moisture and sun damage. Additionally, it’s very likely to blow off the headstone at some point. While this method is inexpensive, it’s not at all effective.
The Best Method
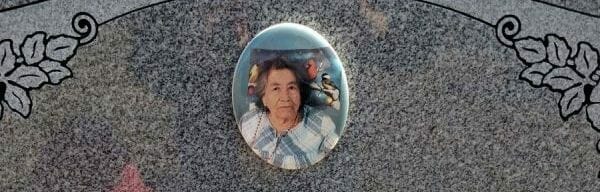
The best way to put a picture on a headstone is to have the photo digitized and then used to create a ceramic photo tile, which can be attached to the monument. Ceramic photos are created by using special toner on an Italian porcelain tile, then fired in a kiln at 1600 degrees Fahrenheit. This process makes them completely weatherproof, and guaranteed not to fade in the sun.
Once the photo tile is finished, it can be attached to the stone using double-sided masonry tape and a bead of caulk. Not only will this keep the photo secured to the headstone for many years to come, but if it ever does come off, or you want to replace it, this can be done without damaging the stone.
How to Get Started
The first step is to select the shape an size of tile you want. It’s helpful to know the dimensions of the headstone and measurements as to where any engraving has been done. You also want to consider if you want it done in a portrait or landscape format. Portrait format means the photo will be taller than it is wide. Landscape format is the opposite. It’s wider than it is tall. The choice of formatting typically comes down to the photo you want to use. Most will be very obvious which way will look better.
When you place your order, you will be asked to upload the photo you would like to use. It’s best to use an unedited photo and include any editing instructions you would like to see done. While some level of photo restoration can be done, it’s always best to start with the highest quality photo possible.
Once your order is placed and photo uploaded, you will receive a proof within a day or two. If there’s something you don’t care for with the proof, more editing can be done until it’s just the way you want it. Once your proof is approved, the process of making the finished piece will begin, and you should receive it in about 2 weeks.
Things You Need to Attach the Photo
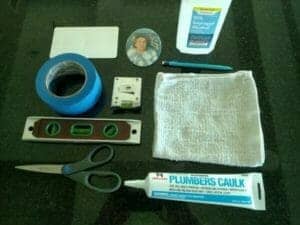 Your finished ceramic photo will include mounting instructions and double-sided masonry tape on the back. However, here are a few items you’ll want to have when your finished ceramic tile comes:
- Rubbing Alcohol
- Clean Cloth/Rag
- Pencil
- Panter’s Tape
- Small Piece of Thin Cardboard/Poster Board
- Tape Measure
- Level
- Scissors
- Caulk (optional)
Preparation Before Going to the Cemetery
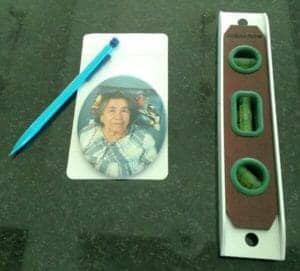 The fist step is to set the ceramic photo on your poster board and trace around it with the pencil. Using the straight edge on your level draw out a perfect rectangle or square (depending on the shape of your tile) around the outline you drew earlier. (If your tile is rectangle or square you can skip this step.)
Next, you want to measure and make a mark at the center point of each side. The ceramic tiles are all measured in centimeters, so using the metric side of your tape measure will make this easier. With the straight edge, draw lines connecting the marks on opposite sides so you end up with vertical and horizontal lines crossing in the center. These lines will help you mark the exact placement you want on the stone, and ensure the picture is installed straight up and down.
Attaching the Photo to the Headstone
Once you’re at the cemetery, locate the spot on the stone you would like to place the picture. If you want to have it centered on the stone, measure the stone to find the exact point.
Then pour some of the rubbing alcohol on your rag and scrub that spot on the stone to make sure it’s clean. Flip the rag over to the dry side and make sure the spot is 100% dry. If you’re not positive, just wait a few minutes, and the alcohol will evaporate.
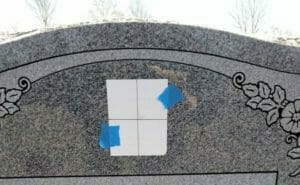 Take your cardboard template and place it in the spot you want. Use your level to be sure it’s straight up and down. Then tape it in place using the painter’s tape. Using your pencil, trace around the outside of the cardboard.
You can then remove the cardboard from the monument, peel the backing off of the double sided tape on the tile, and carefully place it into your markings. Don’t press the ceramic hard onto the stone until you’re sure it’s positioned perfectly because once the tape has a strong hold, it’s very hard to remove it and start over. Once you’re certain you have it where you want it, push the tile against the stone with firm pressure, but not so much that you might crack it.
the final step of running a bead of caulk around the ceramic tile is optional. I will create a more solid bond and keep water off the double sided tape, but some people don’t care for the look. If you are going to use caulk, run a fine bead so it isn’t too thick. Also, think about whether you would prefer a clear caulk, or white. Once again, this is entirely personal choice.
Conclusion
That’s all there is to it! Now you’ll have a level of personalization on your loved one’s headstone that everyone will enjoy seeing when they come to visit the grave site.
We offer ceramic photos in 8 different shapes and many sizes. Our photos are professionally made and guaranteed for life against fading or cracking due to the weather. Plus, we offer them at very low prices! To browse our selections, click here.
I was wondering how I was going to get the picture centered and straight on the grave marker. This was very helpful. Thanks
Thanks for the tip that ceramic photo tile is one of most common ways to have a photo on a tombstone. After years of neglect, my family has finally decided to get new monuments for the graves of my grandparents. Hopefully we can some good photos of them and be able to scan them properly so that the ceramic tiles come out with good quality.
Will the tape work in winter?
Terry,
We recommend waiting until a day when temperatures are above freezing to install the photo. But once attached, the tape will hold up fine through any weather. The most important thing for good adhesion is to make sure the area of the headstone you’re attaching the photo to is clean and completely dry.
Thanks,
Headstone Pics
What kind of double sided tape do you use please
Neil,
We use 3M’s VHB 4991 Tape.
Thanks,
HeadstonePics.com